Cardboard Mushroom Spawning

By Joe Anderson, RAD Sustainability Lead Predecessor.

14139427_10153920101001687_2096929187_o

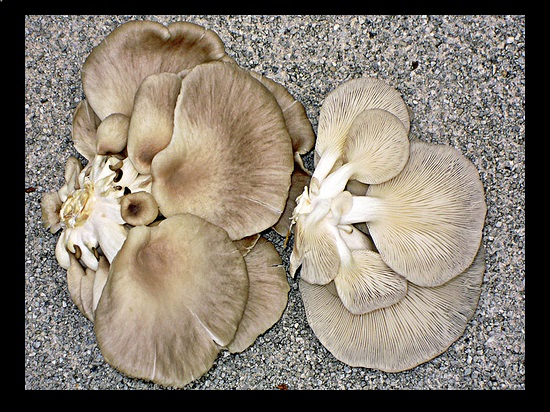
RAD Sustainability worked on inoculating cardboard with oyster mushroom spawn. Cardboard is a great medium to establish a mushroom colony with because it’s flat and easy to transport. Once it’s completely covered with mycelium, you just slap it down where you want mushrooms to grow, give them some substrate to digest, and they are ready to go.

We used pearl oyster sawdust spawn from Fungi Perfecti to make our cardboard colonies. First, we soaked our cardboard overnight to make it soft and moist, just how our mushrooms like it. Then we mixed up the sawdust spawn with water and shredded it up by hand as much as possible.

We laid down a piece of cardboard and peeled off the first layer and set it aside, revealing the corrugations. Next, we threw on a few heaping handfuls of oyster spawn and worked it into the grooves. Finally, we placed the first cardboard layer back over the inoculated cardboard and repeated the process, stacking up the cardboard spawn layer by layer.

And that’s all there is to it! It takes about three weeks for oysters to colonize the cardboard. When they’re ready, we’re going to sandwich them in towers of straw which they’ll consume in a few months before fruiting. Until then, we have to keep them moist and watch out for mold or any other contamination. I’ve been checking on our cardboard spawn each morning, and I can already see them starting to take hold!


Spring 2014 Aquaponics Update

By Rhianna Hruska

The Clean Energy Committee has funded a solar tube installation in the RAD Hybrid Solar Greenhouse.  This will allow the bottom bed of plants to receive more light during the summer.  This method ultimately saves energy because grow lights will not need to be installed.  The materials are on their way and the solar tube will be installed soon!  The funding is student AP
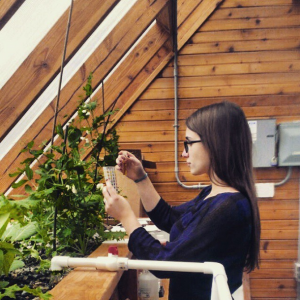
also paying for calcium and potassium API Water testing kits so we can better understand the nutrient levels cycling in the water.  Ammonia, Nitrite, Nitrate, and pH levels are tested daily.

Work parties for the Aquaponics Systems are Mondays from 5-7PM.  Work parties will continue throughout the summer and all are welcome to join.  The work party for this coming Monday, May 15, 2015, will be at the Organic Farm Aquaponic Greenhouse.  Come join us and learn more about Evergreen Aquaponics!

We also have an announcement from our operations director, Daniel Cherniske:

“For about two months, we have been cultivating Desert King Fig cuttings in our Deep Water Raft Culture system here at the Evergreen State College Organic Farm. They have surpased all expectations and grown incredible root and leaf structures. And now they need homes. As a fundraising endeavor for the operational budget of the system, we are selling these incredible, high producing, bioregionally adapted fig trees for a sliding scale of $20-40 dollars. Your support goes directly back into the amazing learning laboratory and community aquaponics center we have estabished over the years here in Olympia. If you are interested, please contact our operations director Daniel Cherniske at danielcherniske108@gmail.com or at 360-918-6682.”

Follow TESC Aquaponics on Facebook! https://www.facebook.com/TESCAquaponics

If you have any questions or would like a tour of the Organic Farm Aquaponics system send us an email at tescaquaponics@gmail.com.

If you are interested in an internship with the RAD Aquaponic system send an email to RADsustainability@evergreen.edu.

Solar Panel Install

By Kai Stroud

 We got new solar panels! Joe Martino, Joe Anderson and I spent a day on the roof of Mod 302 with Jesse and Sean from South Sound Solar to install them. They look super classy up there.

302 solar panels

We’ve been talking about putting more solar panels in the mods, and we’d love to get some of our fellow students involved in the process. It’s pretty simple–piece together a metal frame on the roof, square it up, attach the solar panels, and plug it in. There should be an opportunity for greeners to help out sometime this year. Head down to Mod 302 and check out our handiwork! We’re getting ready to put a garden bed in the front yard there, too. Right now it’s just a square of ripped up grass and woodchips, but a month or two from now we’ll be looking at a big beautiful perennial plot.


Some Summer Updates

By: Joe Martino

It was quite the end of the year.  The hybrid solar aquaponics greenhouse obtained its certificate of occupancy, South Sound Solar has passed along a request for a down payment on the solar panels we plan to install on 302, the HRV we plan to install in 305 has been permitted, I got to go to California to see Max Meyers and take a two day intensive aquaponics training, I earned my operators license on the GCMS to test methane concentration in the biogas digester, and we completed our small scale aquaponics system in the lab.  Joe Anderson of Sustainability worked in conjunction with Noel LeRoy and Daniel Mountain of grounds to develop a beautiful garden by the greenhouse.  The garden features sunchokes, squash, corn, bush beans, lamb’s quarters (aztec purple) and quinoa!  Most recently, we laid irrigation for that garden.  Contact us if you want to be involved!


Building a Hoop House for the Mod Shop Garden

By: Joe Martino

Daniel and I also undertook the development of a small scale “barrelponics” system.  This was not based on Travis Hughey’s model, however we did build the system with cinder block supports and 55 gallon plastic barrels for grow beds and the fish tank.  We were advised by Jessica to utilize one of our 50 gallon Rubbermaid stock tanks as a sump.  The purpose of the sump in this situation was to maintain a consistent water level in the fish tank.  As the water level decreases, the dissolved oxygen level decreases as well, leaving the fish with less breathing room.  Ammonia levels can also reach toxic concentrations, further deepening their plight.  The goal of the sump was to avoid these issues, so we started moving forward.

It took a long time to understand what we were doing.  We had lists that were amalgamations of PVC parts for three different aspects of the same project, and became quite confused.  Soon, we realized we had to consider the construction of a PVC greenhouse and the system that would go inside separate projects.  We started with the greenhouse.

Building greenhouses in the Pacific Northwest in the winter two years ago was a hell in and of itself.  We dug holes, scooped the water out, placed the pipe. scooped the water out, etc.  It was our first build so we went overboard and didn’t do enough research into designs.

We used ½” PVC for the whole greenhouse, went up about 9 feet out of the ground.  We scavenged some five gallon buckets from around downtown; The Reef and The Gyro Spot.  We used painters plastic as a cover, and started digging a hole for the sump and laying cinder blocks for the foundations of the beds.

About two weeks after we finished construction, a snow storm destroyed the greenhouse.  Our second design was essentially a smaller wind tunnel.  We malleted some PVC pipe about 1’ into the ground and found some rebar that was originally slated to be used for the construction of a concrete geodesic dome.  Then we stretched plastic and haven’t looked back!

It’s such an amazing experience, to fail.  It is the ultimate path to wisdom.

A Brief History of the Greenhouse

By: Joe Martino

The greenhouse itself was quite the process.  It was started two  years ago by a group of students who had developed independent internship and learning contracts through RAD Services to build it.  After one or two trips to the Clean Energy Committee (CEC) and the Campus Land Use Committee (CLUC), that group earned funding as well as rights to build on the SW corner of N Building in campus housing.  The group continued to struggle with bureaucracy, and during their efforts, the initiating student completed his collegiate career at the end of summer in 2012.  At this time I came on as the site and project manager, and in the fall, developed a similar learning contract.  

With the majority of the team intact, and continued support from RAD and the CEC, we worked to reestablish communications with the CLUC, began networking to learn, and developed an inventory of materials that had been purchased by the initiating team.  Reestablishing communications with the CLUC consisted of developing transparent and consistent communications, as well as distributing responsibility for various parts of the project among RAD Pro Staff and Campus Facilities members.  Scott Morgan, Evergreen’s Director of Sustainability, took on the role of project manager to work with the students and guide them through campus processes.  

Networking to learn consisted of the establishment of communications with Jessica Schilke, an Evergreen student who had established a Deep Water Culture aquaponics system at the Organic Farm.  At this point, the system is fully operational, and I believe is almost entirely run by interns!  If you are interested in being involved I believe you can catch up with her.  Jessica, myself, Daniel Cherniske, and Grant Gilmore were also fortunate enough to take a few trips out to some aquaponics enthusiasts in the state.   

The trips were designed to further acquaint ourselves with the practice of aquaponics, and these were very fruitful trips.  For the first time, at least for myself and Daniel, we saw swirl filters, auto-siphons, media beds, red tilapia, blue tilapia, and papayas being grown in Washington State.  There is more info on this work in another post!  Check it out!

The inventory was a slog through past purchases, through which we discovered a number of materials that we did not feel to be suitable for their application.  A number of these concerns were supported by vendors, so we moved to recoup costs through returns, and were quite successful in this endeavor.  

More soon.


Edible Mushroom Path

By: Kai Stroud

Hi, folks! My name’s Kai, and I recently became a member of RAD’s Sustainability crew. I study mycology here at Evergreen, and I have big plans in store for our campus–mushrooms! We were recently cleared to install edible mushroom plots, which we hope to finish in the next few weeks. The plots will line the sides of our newly designated Edible Mushroom Path and will include three delicious mushroom species: Pearl Oysters (Pleurotus ostreatus), Chicken of the Woods (Laetiporus conifericola), and Lion’s Mane (Hericium erinaceus). Each of these are easy to identify, native to the northwest, and most importantly, very tasty!

 oyster lions mane chicken woods

From top to bottom: Pearl Oysters, Lion’s Mane, and Chicken of the Woods. all images from inaturalist.org.

The Edible Mushroom Path will be located between A and E buildings, nestled in that little forested area behind the smoking pit. Stop by if you want to check it out! I will be posting more about it as we make progress. There may also be a few opportunities for students to help us set it up and learn a little about mushrooms in the process–check back soon for more info!

Surprise in the Garden!

By: Joe Anderson

Hi Everyone!

Well, the new beds by the greenhouse are really filling in. The bed closer to the greenhouse is lush with quinoa, lamb’s quarters (an edible weed), and sunchokes. Squash and corn were just inter-planted in the open spaces. Because these plants grow close together, there is ample habitat for smaller animals to be protected from larger predators. In the patch of lamb’s quarters by the central path, we find a happy surprise: a tiny birds nest, completely inaccessible to cats and invisible to most people. We want birds to live in our garden; they eat insects, keeping pest populations in check, and transform these pests into valuable plant nutrients in the form of poop. Keep your eyes open in the garden, you never know what you’re going to find!

nest in garden blogpic

New Beds By the Greenhouse

As many of you have noticed, there has been a lot of changes behind N building where the greenhouse is being built. As we moved into the last phase of greenhouse construction, we also finished the beds going in next to the greenhouse. These beds are going to be used for growing annual crops to be donated to the food bank on campus.

greenhouse beds

Currently, we are planning several polyculture techniques for these beds. Including the 3 sisters Native American planting guild. This involves planting corn, pole beans, and squash together in the same space. The corn provides a natural stock for the beans to grow on, the beans fix nitrogen from the atmosphere into the soil and reinforce the corn (to protect the stalks from breaking in heavy wind), and the large squash leaves shade and cool the soil, reducing the amount of watering the plants require. These 3 plants also have different root depths so there is minimal competition for nutrients and they don’t complete for sunlight. This is an example of polyculture principles, where we mimic natural symbioses in nature while using plants that benefit humans.


The bed closer to the greenhouse (on the left in the picture) uses hugelkultur design principles in the back third of the bed. With this design method, we bury large pieces of wood at the base of the bed. Wood, especially decaying wood, has a high water holding capacity, meaning that more water gets held in the root zone of the plants, rather than draining deeper into the soil horizons. We planted potatoes this year over the hugelkultur, since they are a thirsty plant and don’t mind wet feet.

Stay tuned for more updates on these beds, or contact radsustainability@evergreen.edu if you want to get involved with the community beds!

UPDATE 7/31:

The beds are glorious! They have filled with Sunchokes, Quinoa, Lambs Quarters, and a variety of other annuals. I think that a huge part of the success of this garden was the fact  that most of the soil comprising these beds was mushroom compost. Soil that rich and fluffy is bound to grow some delicious crops!garden update

Green Cleaning

RAD Services uses green solutions when we clean because they are economic, effective, and non-toxic. We encourage students to do the same. You all may participate by opting for environmentally-friendly and non-toxic cleaning products, “do it yourself” natural cleaning products, and collaborating with your friends in buying the latter in bulk.

With just a little bit of effort, you can make your own cleaners out of natural ingredients. They are also comparatively economic to buying premade cleaners.

Here’s a few to try out:

All-Purpose Cleaner

  • 1 2/3 cups baking soda
  • 1/2 cup liquid castile soap
  • 1/2 cup water
  • 2 Tbsp vinegar

Mix baking soda and liquid soap with a fork in a bowl. Add water. Add vinegar last. Pour into squeeze bottle; if too thick, add more water. Shake well. Use for a simple clean of the tub, sink, toilet, counter, etc. Scrub and rinse.

Mirror and Window Cleaner

  • Club soda
  • Spray bottle

Put club soda into a spray bottle. Spray on surface and rub with lint-free cloth or squeegee. Ta-da!

Scouring Powder (can be used for stubborn stains, dirty dishes, soap scum, and anything that is generally gnarly)

  • Baking soda
  • Liquid castile soap

Wet the area you want to clean, sprinkle baking soda over it and rub with a wet rag. Add soap to the rag if you need more cleaning power. For toilets, sprinkle baking soda into the bowl, add a few drops of soap and scrub!

Oven Cleaner

  • 1/4 cup baking soda
  • 2 Tbsp salt

Hot water

Remove any charred spills and chunks with a non-metallic brush or sponge. Mix baking soda, salt, and enough hot water to make a paste. Apply to oven surfaces and let stand for a few minutes or overnight. Scrub with scouring pad and water. Pick the paste off any oven racks and heating elements! Another good trick is to line the bottom of your stove with aluminum foil.

If these have piqued your interest, here is a printable pdf of these and more recipes.

If you want to go really in-depth with this stuff, here is a comprehensive guide of non-toxic housecleaning methods. 

If you want to purchase pre-made cleaners then please take a gander at these resources. They will help you determine which cleaners are actually “green”

Green Seal Certification Website

A Sample of Articles on Green Cleaning