We began to put together our presentation for our focus group. gathering together all of the things we accomplished and their value to the farm
(Also think this is editable so please be careful while viewing.)
We began to put together our presentation for our focus group. gathering together all of the things we accomplished and their value to the farm
(Also think this is editable so please be careful while viewing.)
We have been working on putting together a Harvest Manual for the Farm. This Manual will have instructions for harvest technique of each crop along with the tools required and pictures.
I have included a link to the Google Doc for the Harvest Manual. I think it is editable though so please no touch-ie, just look-ie 🙂
This will be printed out and laminated for our week 10 presentation.
It is only a prototype because we did not have enough time to gather data on all of the crops on the farm, but it can be a future project for the farm to pursue.
We created Harvest Lead Instructions as well as Student Instructions for Harvest (both included in PDF above).
We printed these out and laminated them and now they live in the harvest shed.
The Instructions will help Harvest Leads prepare the Wash Station for Harvest more efficiently and will help students to better understand the Harvest Chart.
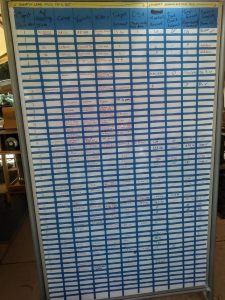
We leaned up the Harvest Chart. Using painter’s tape, we created equally spaced grids that will hold all information required for harvest and record keeping.
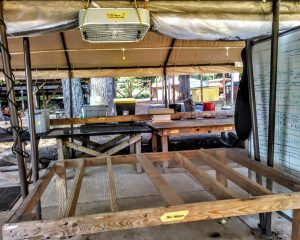
This week, we organized the wash station.
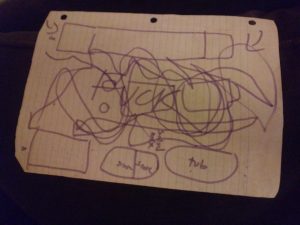
Its design at the beginning of the program did not allow for cohesive flow. Students entered the wash station without a designated place to wash their freshly harvested produce. They would work on whichever surface was available, and most of the time did not know what to do with their produce – having to ask multiple questions and take many unnecessary steps. As the spaghetti diagram shows, this was not lean:
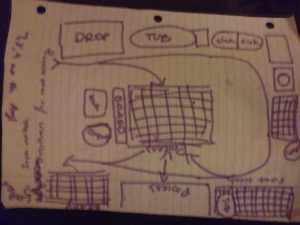
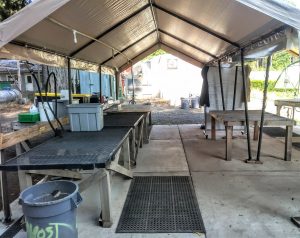
In order to make the flow of the wash station more lean, we needed a system based on each crop’s journey from field to market. We came up with this design:
Then we physically moved everything around to achieve the desired flow.
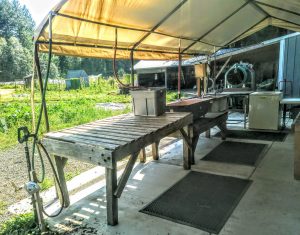
First, we moved the container washing station outside of the produce washing station. Prior to this move, containers were being washed at the very start of the flow line, and the bins were taking up the entire left side of the wash station, leaving very little room for produce processing. By moving the container washing station out of the wash station, we freed up a lot of room to be able to work with:

We designated the first table in the flow to be “produce drop off.” This is the students’ first stop when they come back from the field. From here they decide where to go next. Salad mix, for example, goes through the iron tub, the bubbler, the spinner, and the dryer before it is bagged – so we placed those stations in the appropriate order:
Other greens, like lettuce and kale, are dunked in a dunk tub, then placed on the drying table under the fan before being packaged and sent to the cooler:
Root vegetables, like carrots and beets, are sprayed off, then dunked and sorted at the root washing section of the wash station. The following table is for sorting the 1st’s (Market) from the 2nd’s (Food Bank) and the 3rd’s (Students). Marked tubs for the 2nd’s and 3rd’s should be placed at this table at the beginning of harvest shift. The final table is the weigh and package table. The scales live there, to be used to weigh things like cucumbers and squash before they are sent off to the cooler. This is also where the harvest tools live during harvest (rubberbands, twist ties, harvest knives, tape, markers, clean bins for market). This is the last stop on the way to the cooler:
Field Trip
We met with Beth to outline the goals of our focus group. We decided that Leaning up the Harvest station was the first priority. We need to organize the harvest shed, take inventory so that we know when to restock, label the location of each item so that it always returns to its home and provide a photographic standard of what the harvest shed should look like when organized. We also want to create a “Harvest Standards” manual with detailed instructions and photographs describing the technique for harvest, tools needed, and aesthetic as well as sanitary standards for each crop. This would help to build consistency in the produce we provide to our customers through market and CSA. We have other goals for making tools more efficient and accessible on the farm but we are focusing on harvest as our priority since it is high season and we need to make sure that no food goes to waste because we are not being thorough and efficient.
We worked on filling out the budget form for our project, we have not quite finished so more on this later.
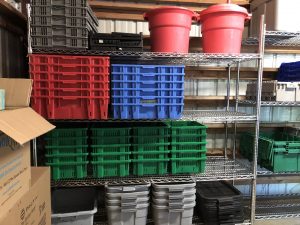
As far as lean production goes we’ve mostly been planning with paper, spreadsheets and inventory sheets but this week we decided to really start getting some things done. We noticed this week that the wash station had some new added parts to it for maximum efficiency. After looking through the harvest shed we decided to re-arrange, organize and lean it up. We dedicated one side of it for flower production, harvest and bouquet making, while the other side contains all of our harvest tubs and washing supplies.
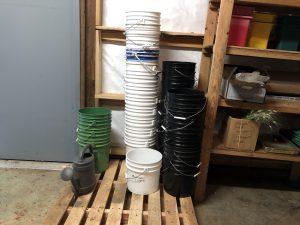
Color coordinated buckets organized from largest to small (5 gal – 2.5 gal)
Green = farm
White = food-safe
Black = flowers
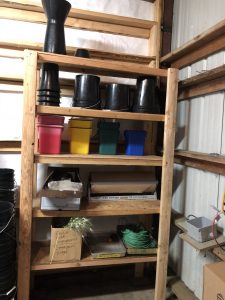
Our new flower harvest station. Bottom shelf is everything needed for bouquet making and wrapping
Eventually we’ll have a color coordinated system for our tubs CSA, market, food bank etc.
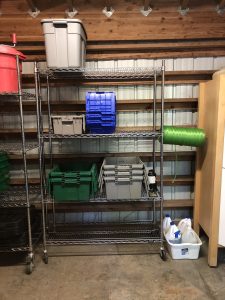
Eventually we’ll have a color coordinated system for our tubs CSA, market, food bank etc.

Harvest and wash station shelf! This is now reorganized so both the harvest and washing stuff is separate so anyone can grab what they need without looking for the wash station box
We will eventually have everything with signs and diagrams so its really easy to get but not too bad for one hours work!
Welcome to blogs.evergreen.edu. This is your first post. Edit or delete it, then start blogging!
© 2025 Focus Group #8 LEAN Production
Theme by Anders Noren — Up ↑