Late nights, early mornings, and food getting cold while excited fingers scribbled down notes and drew delicate lines is the best way to describe the last 3 days of the course.
Out of the whole class, we formed design teams of 4 based on interests, skill sets, strengths, and weaknesses, and each set out to different properties in Golden Bay who were interested in a permaculture design for their property.
I chose Uta and Steve’s property, a 2.4 acre place currently home to a happy family 2 sheep, and 10 chickens. They’ve been struggling with super challenging soils over the past ten years, and though they have some fruit trees and a small garden, they really wasn’t producing nearly as well as they could. I picked this one mainly out of my desire to actually change a place that already has systems in place, which just aren’t effective. The other properties were more or less blank slates.
The client interview was fun and relaxed, with Uta and Steve both happily chiming away in response to each of our questions. We inquired about their needs, capabilities, dreams, passions, knowledge, skills, experience, habits, and visions.
Steve being a full-time builder and Uta being a school teacher, they are pretty limited on time. They said they’d like to have WWOOFers come during the spring and summer to help them maintain gardens. They identified their top priorities being to keep weeds down and prevent overgrowth, improve the soils, grow significantly more fresh foods, and to create a system that has overall flow. They dream of going to the garden to pick fruits and vegetables for dinner, and gave us a list of some things they would like to grow and eat. Most of all, they wanted to be inspired by a plan that showed them how they could improve things, and told us that if they feel passionate and excited about it they will actually invest the time and money to implement our design!
Then they took us on a walk around the land and pointed out different things.
We conducted 4 basic soil tests on different parts of the property, and realized immediately that they weren’t kidding about the poor soils! They are on straight iron pan, and the top 4-6 inches was entirely solid, concrete-like, compacted soil. Their were some slight differences between place to place in terms of moisture content being higher and infiltration being slower in the lower elevation spots. The pH was also fairly acidic, being between 5.5 and 6.0 across the board.
We identified the NW prevailing wind, used the compass to identify north and map the sun sector, drew in the shade behind trees and buildings on the map, marked in the frost pockets, and outlined the flow of water on the property.
We also walked around and noted the elements that were definitely problematic and needed to change. Their garden beds were overgrown with weeds, and in a spot where they claimed it got “no sun” in the winter. The chickens hadn’t been moved off of their hillside paddock for 6 years, and the patch was now barren, eroding soil. The bees were in a very shady corner of the sheep paddock, a considerable distance away from the food production with no sources of nectar nearby. Their were patches of dried up soil and dead grass throughout the property where they had sprayed for california thistle and gorse weeds (which I did later research on, to find that they are both indicators of poor-draining, eroded soils). There was no active composting system going on. The septic tank’s overflow system leeched out into a trench in the sheep paddock and filled up a pond they dug at the bottom, which they said is susceptible to overflow in the winter.
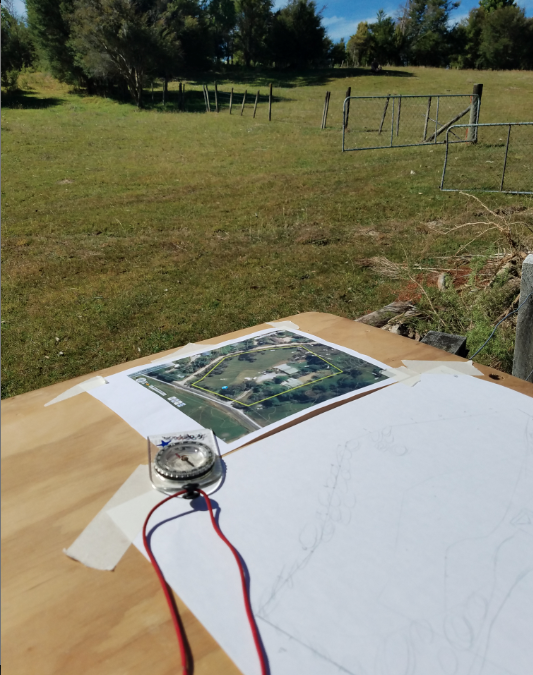
Starting a rough sketch of a base map
Back at Tui, we developed a more detailed base map, with accurate angles and placement of objects, which we were able to obtain through measurements on site and photos and videos we took.
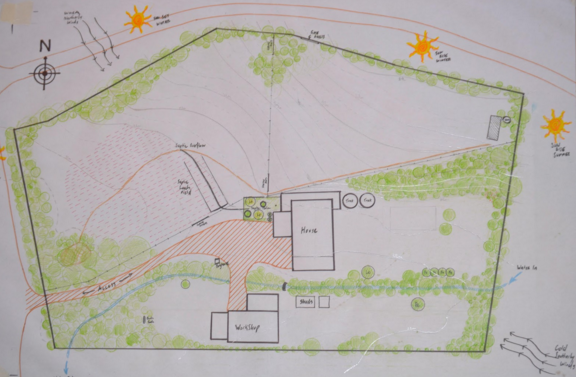
Completed base map (P.S. I really love protractors!)
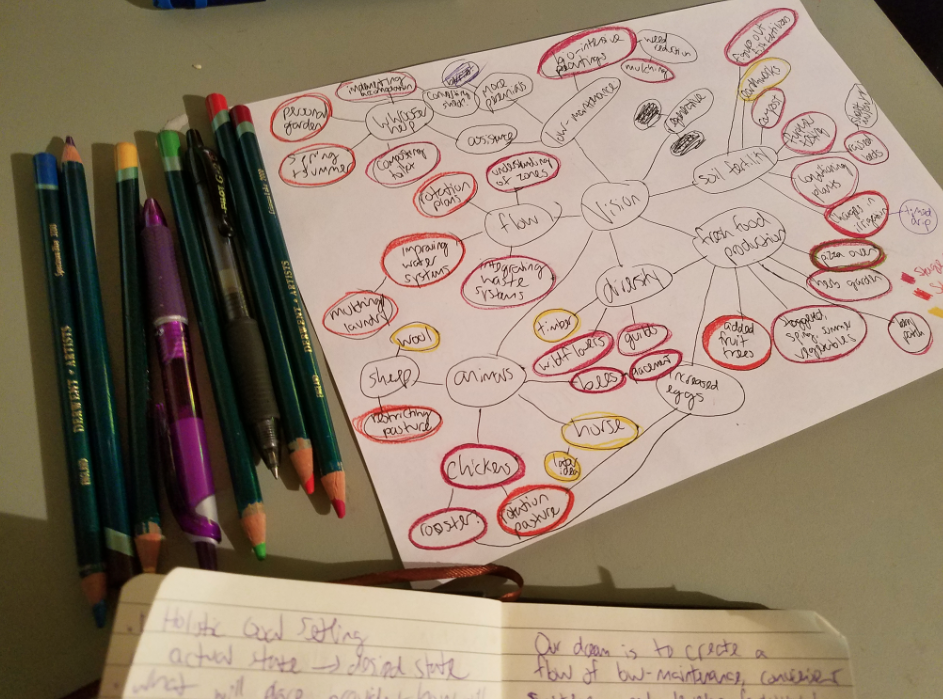
The next morning, we began the visioning process. We looked over our notes from the interview and picked out key goals and words to identify what their overall dream for the property is. The goal is to write a couple sentences that, if the client said it out loud, would feel really good about. We came up with this statement:
“Our property utilizes proven, low-maintenance, regenerative systems to increase soil fertility and fresh food production. We feel uplifted by the diversity and flow that nourishes and further enriches our home.”
With the vision in mind, we made a bubble map for holistic goal setting, branching off different changes that must be made in order for the vision to come true. Low-maintenance, flow, diversity, animals, fresh food production, and soil fertility were our categories, and they each have specific solutions to the problem outlined. We separated out the goals into 3 stages of implementation, the first ones being immediate actions, second being for next year when WWOOFers come, and third being long-term plans.
Next came the ideation process. We discussed what specific things we wanted to implement in order to meet our goals.
We made a few overlays for the base map to show the property in different phases. On a clean slate, we placed these things on the map. Without setting in stone, we made cutouts of each item and moved them around until we came to some consensus. Of course, after this first consensus we moved things around quite a few more times after further consideration.

”
Next, we grouped the categories of our placements into clear zones.
Before going ahead and drawing in all of our ideas, we spent some time hitting the web and some books to research the practicalities of our ideas. I focused on researching cover crops, compost systems, and worm farms, and found some valuable information to pass on to them. All are great options for making a difference on their soils and production!
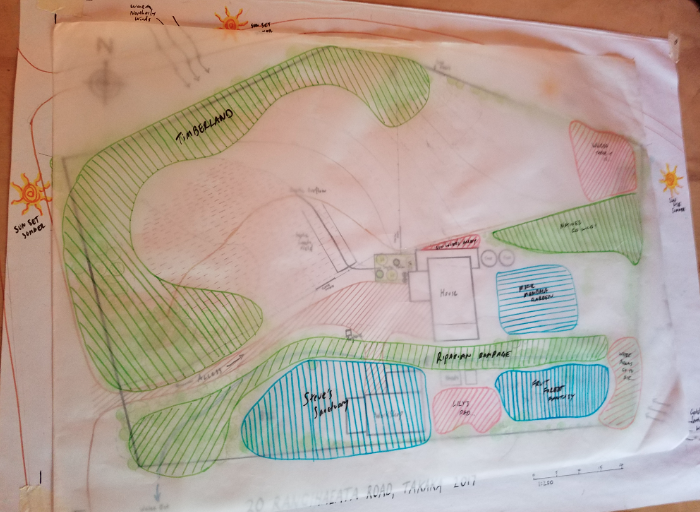
And so, after valuable knowledge from resources and some feedback from the teachers, we began our broadscale design of what the property could look like in 20 years if they implemented our design.
We added in an exotic “Timberland” for Steve to grow wood for his building business, a three-bin cold compost (low-maintenance) system, a WWOOFer sleepout in the shady corner of the pasture where the bees were, a mandala garden behind the house in a sunny field which will contain a rotating salad bar of fresh veggies, a low-lying riparian planting upon the creek, and a food forest with a fruit orchard and an understory for the chickens to rotate into. The current placement of the firewood shed (near the mandala garden) is one of the sunniest sections on the property so we moved it to the shady section in front of the garage and added in a firepit there for a nice social space. We also lined a sunny strip by the porch with another annual veggie garden.
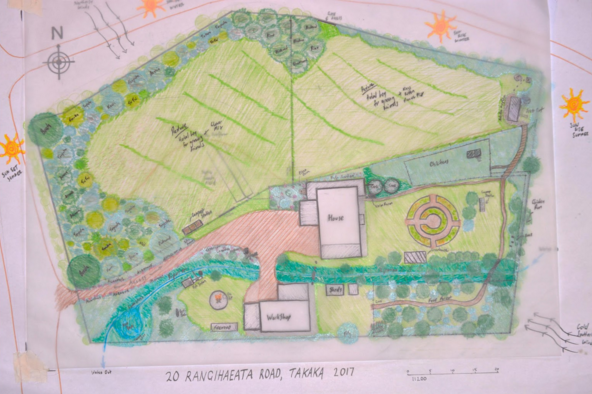
Voila! The finished product!
We didn’t have time to do a detailed design for each section, so we split up some of the important ones. One member took timberland, two took on the annual veggie gardens, and I embarked on creating a detailed food forest design.
I wanted the understory to be a chicken-nutrition haven, full of good forage crops, as well as pollen sources for bees and beneficial insects. All of these plants are pollen rich, and all but daffodils can be eaten by chickens.
The understory:
Crimson clover- Nitrogen fixing and chicken feed
Comfrey- Bio-accumulator, key compost ingredient, and chicken feed
Borage- Beneficial insect attractant, chicken feed, and tasty flowers for salad
Daffodils- Late blooming to provide fall nectar source, and adds color and beauty to the garden
Buckwheat- Beneficial insect attractant, chicken feed, and seeds can be harvest and ground to make flour
Phacelia- Beneficial insect attractant, chicken feed
In terms of the higher, fruit producing layer, I chose all frost-tolerant plants because the section where the food forest would be put in gets frost in the winters. I suspect that when all of these things are put in, they will need lots of compost in order to take off and get going well. This project will have to be undertaken after the compost system is well-established.
I organized the shrubs so that the shade-tolerant plants hid behind the shadows of the future trees, and the full sun plants got their optimal light. All of the shrubs produce flowers, and tasty yields for humans and chickens! There was also already a thick patch of jerusalem artichoke which will make great chicken munchies.
The shrubs:
Lemon Verbana (Shade)
Rhubarb (Shade)
Gooseberry (Shade)
Goumi Berry (Shade)
Pineapple Sage (Sun)
Cranberries (Sun)
Blueberries (Sun)
Raspberries (Sun) In a patch off to the side so they don’t take over the forest.
Taking a look at the canopy layer, I started by digging in deeper, to the roots. Using the edible forest gardens magazine, I researched different root stocks for iron pan soils. I chose a semi-dwarf stock called Northern Spy which is suited to heavy, low-draining soils. From there on out I picked some different varieties of fruits to be grafted on to plan for year-round nectar sources for pollinators, however taste is super important so it’s open to flexibility. The key thing is the root stock!
They already had a few lemons, several fejoas, some mandarins, and a couple plums growing on the property, and Uta expressed interest in adding in apples and nashi pears, plus some other fruits.
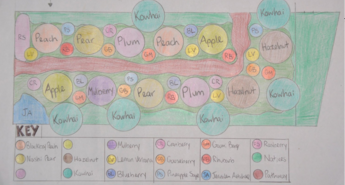
The pathway into the forest has a human entrance near the garage, and a fenced alley-way entrance for the chickens to enter in from their coop paddock. The food forest can be seen on the larger broadscale map in the bottom right corner.
Coming together, we realized we had a significant amount of work to present to the client, and were all really happy with the turnout. Uta wasn’t able to make it to the presentation, but Steve came and was very impressed. They have our contact info and plan to send us questions now and then when they start acting on some of our ideas. It felt amazing to use my newfound permaculture knowledge in a real-world application, and I enjoyed every step of the way. Maybe this was my first step in a career of design, who knows!
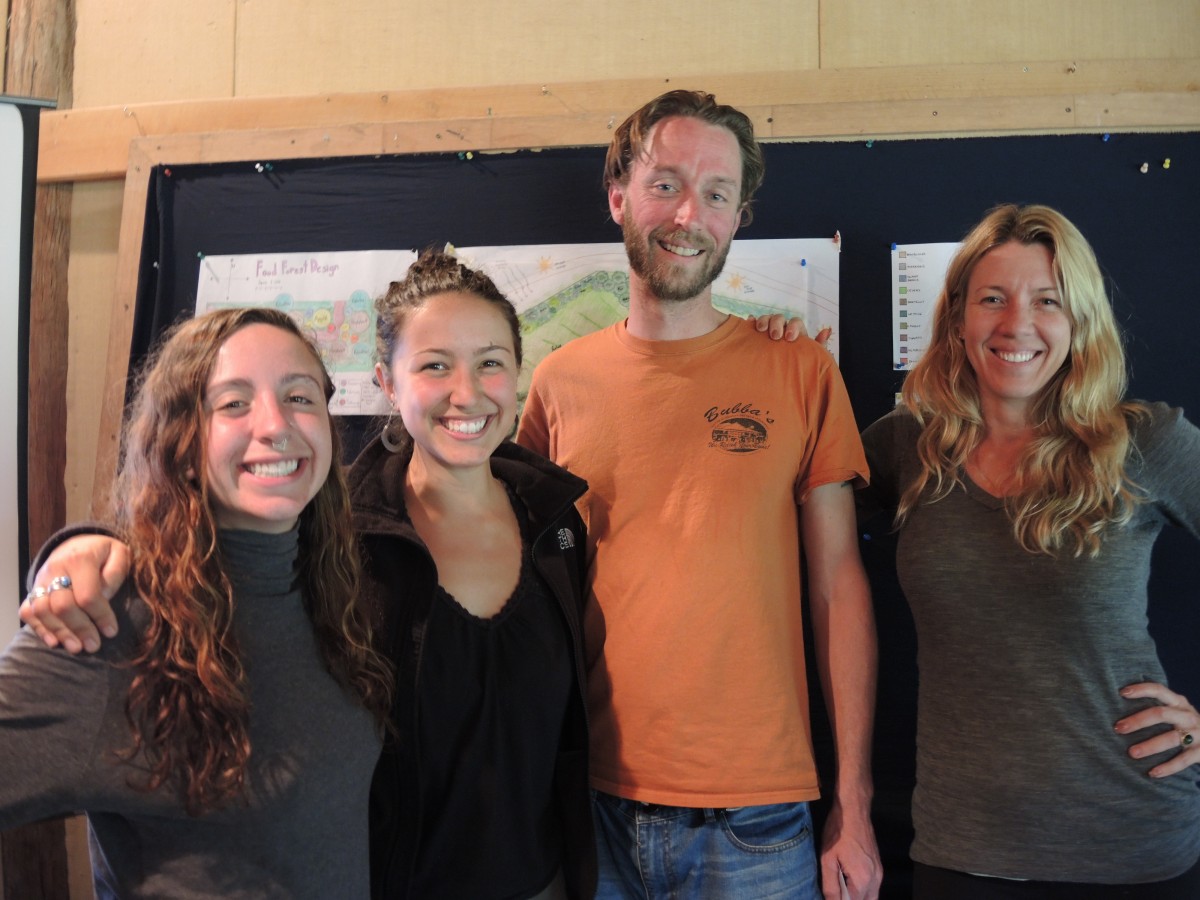
Super happy design team post-presentation!
Here’s the link to our full presentation, if you want to see the detailed staging and planting plans!
https://docs.google.com/presentation/d/1XYfng1jqsdevljrjoayu0JjwViZkyKJPH55ekRcIM2A/edit?usp=sharing