
Insect collecting is an interesting hobby for many, but is also very useful in scientific research. This post will explain how to collect and preserve insects, and show how they should be pinned.
Insect collecting can be done at any time, although they are mainly present during spring, through late fall. Summer is probably the best time, as insects are most abundant. Warm, sunny days will likely have the most insects present, however it would be wise to check throughout different times and weather conditions, as different insects will emerge at different times. At night, street lights and porch lights are a great place to look. Leaf litter and plants are likely to house insects, and there are also many nocturnal insects that stay away from lights.
Collecting Equipment:
- Insect Net – These can be bought or made. They should be made from netting, which is stitched to a muslin or canvas cloth that wraps around the wire. From there, the insect can be transferred to a jar, either by putting the jar into the net, or by holding the insect by the thorax.
-
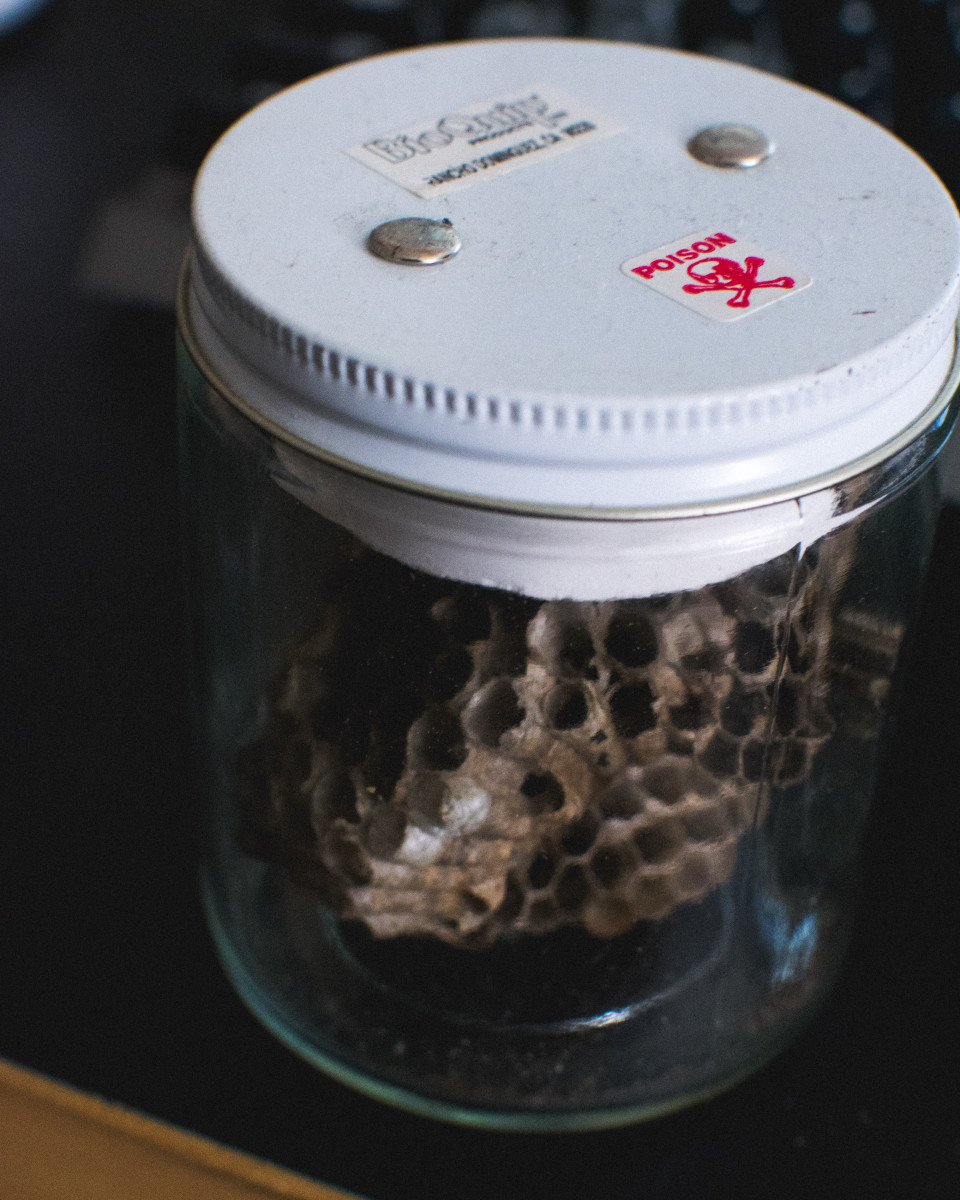
My killing jar. PC: Colton Weaver Killing Jar – It is best to have 2-3 jars in many shapes of sizes. Ideally, they are corked, however this may depend. They should be conspicuously labeled “POISON”. Plaster or cotton is added to the jar to hold the killing agent. Borror, Delong, and Triplehorn recommend cyanide, however ethyl acetate can also be used and is significantly safer. Carbon tetrachloride or chloroform can also be used.
- Pillboxes with tissue
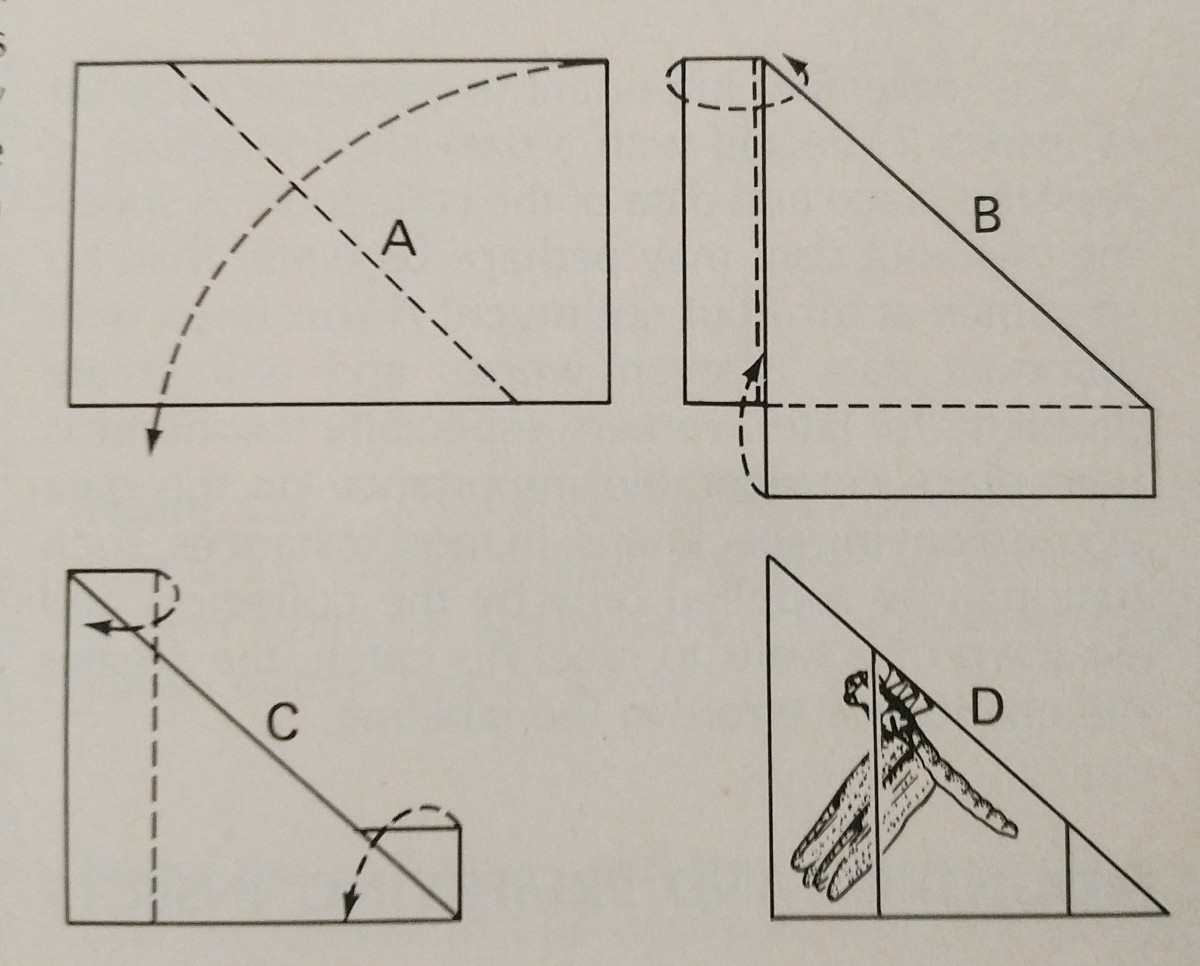
- Envelopes, or paper to make them – Useful for temporary storage. These can be easily constructed in the field and will keep your specimens relatively safe.
- Vials filled with preservative liquid
- Forceps
- Hand lens
- Aspirator – These capture small insects into vials using your breath. Typically they have a screen to prevent you from breathing the insect in.
- Beating umbrella or sheet – A sheet or umbrella is placed beneath a plant, which is then beaten or shaken so that small insects fall onto the sheet.
- Sifter – Leaf litter can be sifted slowly onto white cloth or cardboard, and then insects found can be aspirated.
- Traps – There are many types of traps. A Berlese funnel has a funnel with a screen, and a light bulb on top, with alcohol at the bottom. Insects are attracted then fall into the killing jar. A light trap can be effective on some insects, and can be as simple as a light above the killing agent, or a walk in trap where insects settle and can be collected by hand. Pitfall traps can be used on carrion beetles or other non flying insects, and are simply cans with bait at the bottom. Insects fall in then cannot escape. A simple trap could just be a sugar solution spread on a surface.
- Headlamp
- Sheath Knife
Handling the Catch: Many soft bodied insects can be placed directly into 70-90% isopropyl or ethyl alcohol. This includes larvae and nymphs of many species, as well as some smaller insects. Hard bodied insects should be put in the killing jar. The length that it takes depends on the insect as well as the killing agent, and may range from a few minutes to a few hours. When the insect is dead, it should be removed as soon as possible to prevent additional discoloration. These can be stored in pill boxes or the paper envelopes described above.
Relaxing: If you cannot pin and spread a specimen immediately, it will likely dry. When it is in this state, it is quite brittle and will break if you try and arrange it. To fix this, you can either use a relaxing chamber, relaxing fluid, or boil the insect in water (however this may damage it).
Relaxing chambers are containers with wet sand or cloth inside. Ideally, carbolic acid should be added to prevent any molding. After a day or two you should be able to manipulate the specimen again.
Relaxing fluid can be made from different mixtures, and usually you leave the insect in it for several minutes. One mixture, often known as Barber’s fluid, is listed below:
| 95% ethyl alcohol | 50 cm3 |
| Water | 50cm3 |
| Ethyl acetate | 20cm3 |
| Benzene | 7cm3 |
Another method that can be used is tap water injection. This works on many Lepidoptera. Using a 20-25 gauge needle, inject water into the thorax under the wing until it is completely filled. After 5-20 minutes, your insect should be relaxed.
Preservation in Fluid: This can be used on many soft bodied insects (such as mayflies, stoneflies, caddisflies, etc), which can’t be pinned unless they are dried as mentioned above. It’s also useful for very small specimens that are going to be studied on microscope slides, and insect larvae and nymphs. Non-insect arthropods should be preserved this way as well.
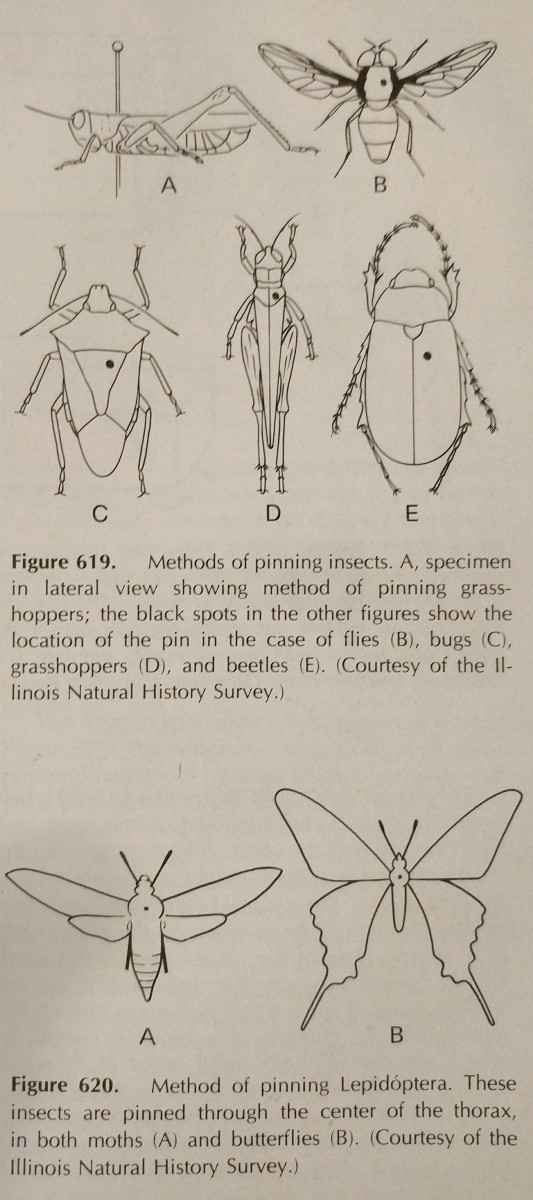
Pinning: This is the easiest way to preserve a hard bodied insect. The colors often fade when the insect dries, however this is difficult to avoid. Specialty insect pins should be used, which are longer and do not rust. These are available in sizes 00-7, however the smaller ones may be less applicable. Different orders should be pinned in different areas, which is pictured. Legs should be extended, as well as the wings. Oftentimes bees will have their tongue extended for easier identification.
It is best if all species in a collection are pinned to uniform distances. About 25mm above the point is ideal, and uniform distances can easily be attained by using a pinning block, which is simply a block of wood with holes drilled to different depths.
Spreading an insect is very much about practice. Using a spreading board makes the task much easier,
and having extra pins and paper strips is essential. Pins can be used to move around limbs and wings.
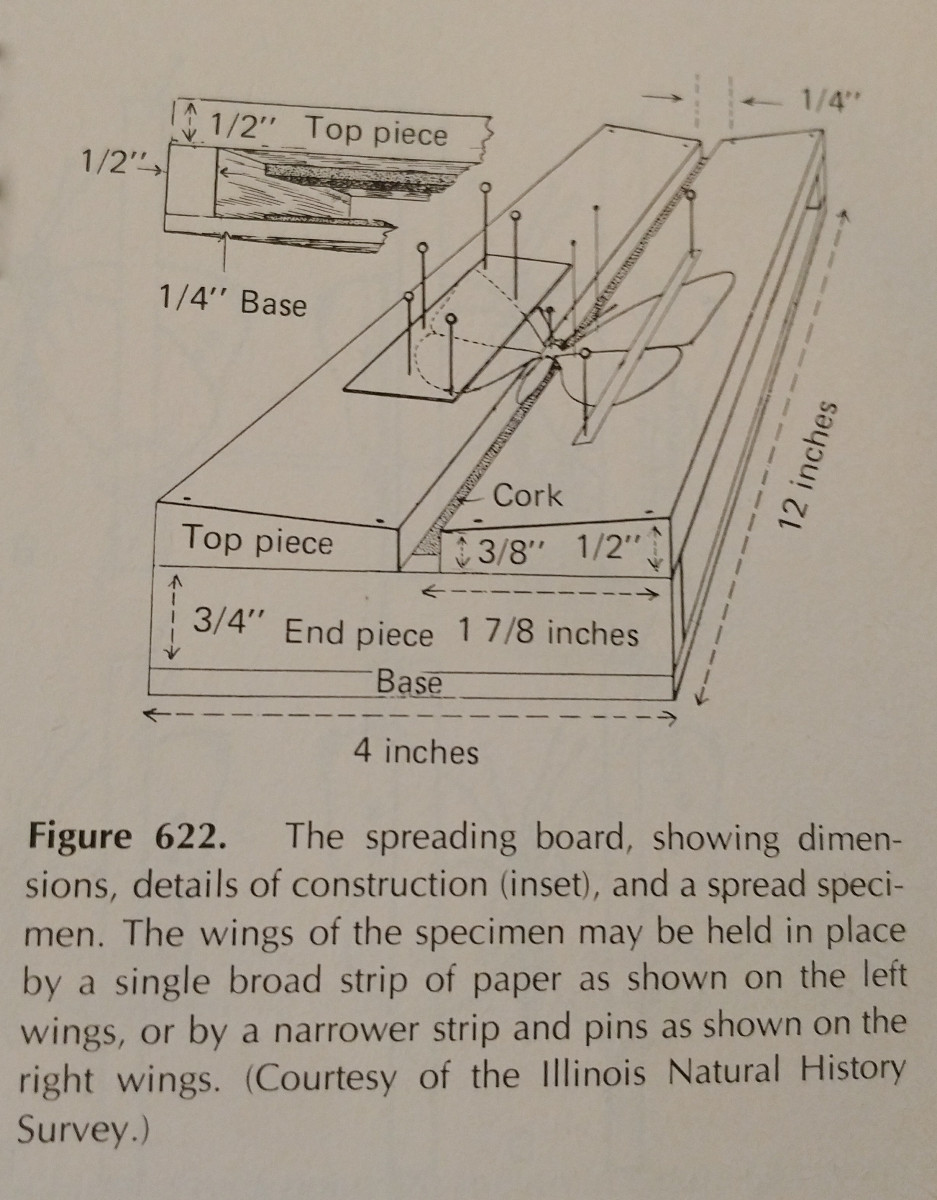
Typically pressure should be applied to the front marginal wing vein, especially in Lepidoptera. The rear margin of a Lepidoptera’s wings should be at a right angle with its thorax, and the hind wings up so there is no gap between them and the forewings, as pictured. It’s important to be very careful, and use forceps to handle the insects. They are very fragile, and often scales and antenna can be easily knocked off. Paper strips and pins can be used to secure wings, and then they will stay in position after they dry.
Small insects need some ingenuity to be mounted, and can be glued onto card tips, tiny pins, or microscopic slides. You simply pin the card tip, put a tiny amount of glue onto it, then glue the insect on.
Drying: Many pinned insects can be air dried in a warm, dry location. Larger moths may need a drying chamber with one or multiple light bulbs inside, and some large specimens may even need to have their abdomen organs removed. There is no definitive time it takes a specimen to dry, however this will come with experience.
Soft bodied insects may be freeze or vacuum dried and then pinned, to create a non-fragile, non-discolored specimen. Typically they would shrivel, however this step makes them dry enough to stay on a pin.
Typically an ethyl alcohol solution is used. Some common ones are listed below.
| Hood’s solution | |
| 70-80% Ethyl Alcohol | 95 cm3 |
| Glycerin | 5 cm3 |
| Kahle’s solution | |
| 95% Ethyl Alcohol | 30 cm3 |
| Formaldehyde | 12 cm3 |
| Glacial acetic acid | 4 cm3 |
| Water | 60 cm3 |
| Alcoholic Bouin’s solution | |
| 80% Ethyl Alcohol | 150 cm3 |
| Formaldehyde | 60 cm3 |
| Glacial acetic acid | 15 cm3 |
| Pitric acid | 1g |
While we are on the topic of solutions, Ethyl acetate can often be ineffective on larvae, so here are killing agents that are sufficient:
| KAAD mixture | |
| 95% Ethyl Alcohol | 70-100 cm3 |
| Kerosene (reduce for soft body larvae such as maggots) | 10 cm3 |
| Glacial acetic acid | 20 cm3 |
| Dioxane | 10 cm3 |
| XA mixture | |
| 95% Ethyl Acetate | 50 cm3 |
| Xylene | 50 cm3 |
Both methods should take 1/2 – 4 hours. All known killing agents remove color, especially greens, allows, and reds.
Typically, preserved specimens should be inspected once or twice a year, in case any liquid has evaporated. If so, it should be replaced.
Mounting on Microscope Slides: There are two types of microscope mounts: permanent and temporary. They use different mounting mediums, and temporary mounts usually have their specimens returned to preservative after the mounting, where it may be kept indefinitely. Permanent mounts are mounted once and then can not be removed, however they may last quite a while, even several years.
Many soft body insects can be put straight into mounting medium, however some need to be cleared in a special fluid first. The main solutions used for this are KOH and Nesbitt’s solution. This process often involves the insect soaking for several hours to many days when done cold, although it can be done quicker using heat and KOH.
Small specimens can be mounted in a normal slide, while larger ones may need a depression slide or support for the cover glass.
The mediums used for temporary slide mounts include water, alcohol, glycerin, and glycerin jelly. Water and alcohol may only last a few minutes before evaporating, so glycerin is generally used if specimens want to be studied for any extended period of time.
That concludes this post, and the preservation section of Borror, Delong, and Triplehorn. Most of the rest of the work on this SOS will be compiling my documents, and slides, as well as making sure my flow charts and protocol are all in order.