
-Begin-
Open Adobe Photoshop CS6- on a Mac, Photoshop will be a icon on the dock, or in the Applications folder (Finder>Applications). On a PC, open the Start Menu and scroll up to Graphics Tools, and select Adobe Photoshop. You can also search for “Adobe Photoshop” or “Photoshop” in the search type-box at the bottom of the Start Menu.
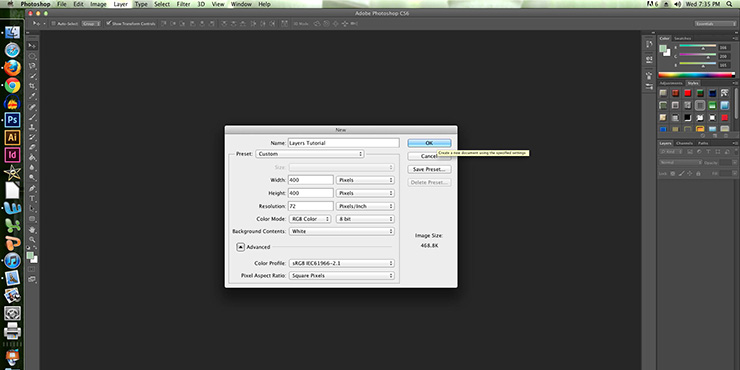
When you first open Photoshop, a window will pop up that allows you to customize your artboard. For our purposes, create a 400×400 pixel artboard with a 72 pixel resolution.
-Paint Bucket Tool –
First we need to determine our background color- you can use the Paint Bucket Tool to quickly colorize your artboard. To do this:
- Select the Paint Bucket Tool on the left-hand toolbar.
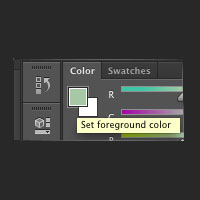
- Select the small colored square in the upper right corner, or the bottom left (there are two) to open the Color Picker window.
- Choose any color, then click OK.
- Finally, click on your artboard, and it should completely fill in with the color you selected.
Tip: If nothing happens when you click, this means you’ve accidently deselected the Paint Bucket Tool, so make sure it stays enabled! Simply click it again if this happens.
-Creating your first layer-
To create the grass, we need to first create a new layer. On the top navigation bar select Layer>New>Layer… then click OK.
Tip: You can re-name this layer at any time by double-clicking the name of the layer.
- Select the Brush Tool from the left-hand toolbar.
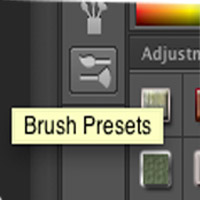
- Select the Brush Presets icon in the upper-right corner.
- The Brush Presets window will pop up- scroll down to preset #134 called ‘Grass’ and select it. Finally ‘hide’ the Brush Preset window by clicking
- Repeat the Color Picker process from the Paint Bucket Tool step- (select the colored square icon, choose your color, and click OK) Choose a color that will contrast against your background.
- Lastly, draw in your grass by holding down the mouse and dragging the cursor around the artboard. You can make your grass infinitely thick or sparse, depending on the desired look.
-Creating a text layer-
To add text, first create another new layer and title it ‘Text.’
- Select the Horizontal Type Tool from the left-hand toolbar.
- Repeat the Color Picker process, choosing a third color which will contrast against both the background and the grass. This will be the color of your letters.
- Click the area on your artboard just above the grass to create a type-box there. Type ‘Layers’ or anything you’d like, and move the text around the artboard using the small dot in the bottom-lef
 t corner of the type-box until you find the place you want the letters to stay.
Tip: You can change the font and size of the text using the familiar topmost toolbar.
Finally, under the Layers tab on the right-hand toolbox, you’ll see your three layers listed in the order you created them- starting with the most recent ‘Text’ layer. Holding down the ‘Text’ layer, drag the box down so it falls between the ‘Background’ and ‘Grass’ layers. You’ll notice that now the text appears to be emerging from behind the grass!
-Creating ‘Group’ layers-
Lastly, to create a Group Layer, you’ll select Layer>New>Group. This will create a group folder in the right-hand toolbox, under your other layers.
- Create two additional layers that will eventually go into this new group folder.
- Select one of these two layers.
- Using the Elliptical Marquee Tool on the left-hand toolbar, draw in an oval or circle emerging from the grass.
- To fill in the oval or circle, use the Paint Bucket Tool to click-and-fill.
- Select the other new layer, and repeat steps 2-4.
- In the right-hand toolbox, click and drag both new layers into the group folder.
- Finally, drag the group folder so it sits underneath all the other layers (except the Background layer, which is unmovable).
Voila! Now get out there and do some layering!
I have a hard time using Photoshop, it has a high learning curve. Most of the time you are better off paying someone to edit your material.